In every tester’s life, there may come the time, when an additional, simple environment is necessary, be it an isolated one or not. Especially if you work in Windows and running Docker may take too long or be discouraged for some reasons. The easiest solution in such a situation seems to be the Hyper-V service and creating a virtual machine. In this article, you will learn:
On my daily basis, I work with my team on software testing for various clients.
You have to know, that planning software testing with The Microsoft Hyper-V service, will be reduced in functionality when run on the client version of Windows 10, compared to the one intended for server purposes, i.e., Windows Server.
Before starting the Hyper-V functionality, it is advisable to check if the computer to carry your virtual machines supports hardware virtualization and the option is enabled. Depending on the processor architecture, this will be the SVM mode of the AMD group and Intel Virtualization Technology for Intel processors. You will find the option in the BIOS / UEFI options.

The next step is to check if the operating system version supports Hyper-V at all. To verify this, type systeminfo in the command prompt window. In the response received, the most important fields to verify are:
Hyper-V is supported in Windows 10 in the Enterprise, Pro and Education editions. To run Hyper-V in the Home version you would need to upgrade it (Settings > Update and Security > Activation),
Hyper-V Requirements: VM Monitor Mode Extensions: Yes
Virtualization Enabled In Firmware: Yes
Second Level Address Translation: Yes
Data Execution Prevention Available: Yes
If all requirements are met, you can run Hyper-V on the machine. You can do this in several ways:
Enable-WindowsOptionalFeature -Online -FeatureName Microsoft-Hyper-V -All
DISM /Online /Enable-Feature /All /FeatureName:Microsoft-Hyper-V
Select Control PanelAll Control Panel ItemsPrograms and Features, then click on Turn Windows Features on or off and select Hyper-V from the list of available components. The components needed to run Hyper-V will be selected automatically. Finally, confirm by clicking OK.

Regardless of how the Hyper-V functionality is run, it will be available only after a system restart.
To start creating a virtual machine, start Hyper-V Manager, and then, on the right side of the window, select New and then Virtual Machine. u.
Aby rozpocząć proces tworzenia maszyny wirtualnej należy uruchomić Hyper-V Manager, a następnie, po prawej stronie okna wybrać New i dalej Virtual Machine.

The Virtual Machine Creation Wizard will open. Confirm the first window by clicking Next. In the next window, type in the name of the virtual machine and, possibly, its location on the drive. It is good to select the Store the Virtual machine in a different location option. This will give more control over virtual machines.
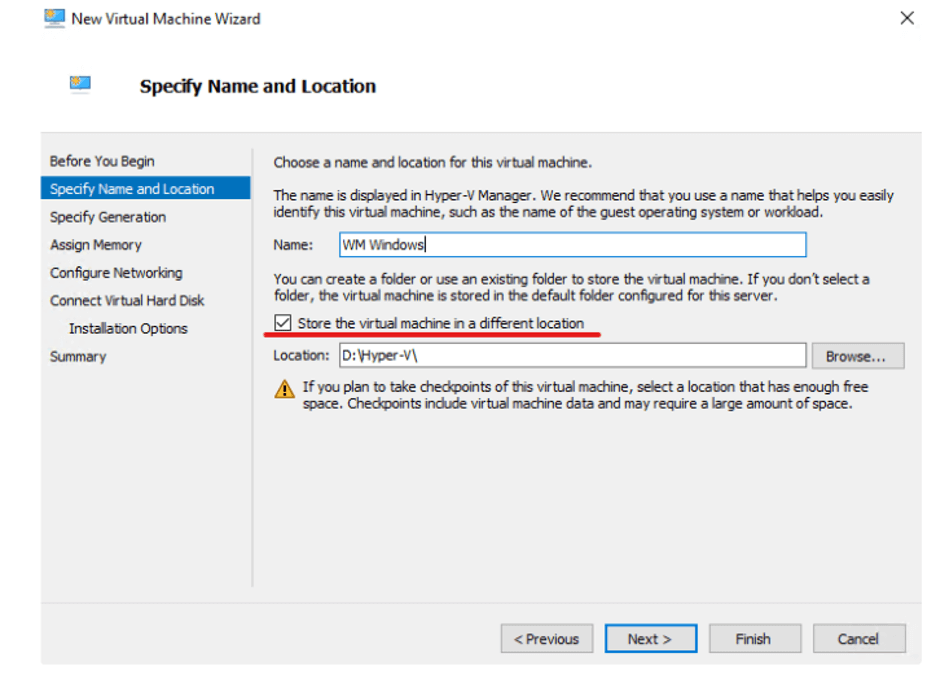
Confirm your selections by clicking Next. In the next dialog window, select the Generation 2 option and confirm your selection by clicking Next.

In the next step, you must specify how much RAM the virtual machine will have. You can leave the Use Dynamic Memory for this Virtual Machine option selected. The next dialog window allows you to configure the network. As we’ll consider it in later in the article, you can click Next without making any changes.
In the next screen you’ll configure the virtual drive for running a virtual machine. Enter the path to a new virtual drive or add an existing one to the virtual machine.

Next, you will be allowed to attach the ISO image of the operating system to be installed on your virtual machine. After confirming your choices, a summary of the future virtual machine parameters will appear. Click Finish to finalize the procedure. You can now see the new virtual machine in Hyper-V Manager.

The next step is to configure network interfaces for the virtual machine. You can do it by configuring a Virtual Switch. It is the link between the physical host interface and the virtual machine interface.
To create it click Virtual Switch Manager in the Actions panel. In the newly opened window select the New virtual Network switch option, then type in the name of the new Virtual Switch and the physical interface of the host to which it is to be connected.

Confirm your choices by clicking Apply. Now, create a virtual interface that will be connected to the Virtual Switch. To do this, select the virtual machine and then click Settings. The settings window for the virtual machine will open. In the side panel, select Add Hardware, and then from the available options – Network Adapter.

Next, select the newly created Network Adapter and the appropriate Virtual switch for it.

After configuring the virtual machine and connecting to the network, the only thing left to do is start your virtual machine. To do this, select it, click Connect, and you can start by selecting the Start command from the Action menu or by pressing Ctrl + S.

To install the operating system on the created VM, you need to mount the iso image with the operating system to it. Go to Settings (the same as when configuring network interfaces), then to DVD Drive tab. Now you can choose the path from which the iso image with the operating system will be mounted.

Then it works like a normal machine, so you need to install the operating system.

After installing the Operating System, the virtual machine is ready to use.

If you want to create a virtual machine with a Linux operating system (such as Ubuntu), you do the same VM creation and in the same way as for a virtual machine with a Windows operating system.
There is also an easier way to create virtual machines. To use it, select the Quick Create option in the Hyper-V Manager’s main window. Then you choose the available operating system, virtual machine name, and which Virtual Switch is to be connected to the created machine. Then you approve your choices by clicking Create Virtual Machine. The other parameters of the virtual machine (disk save path, RAM, etc.) are automatically determined by the program and can be edited after the virtual machine is created.

When the creation is complete, a summary window will appear. From there, you can go to the connection to the virtual machine or edit its parameters.

After connecting to the virtual machine, you need to install the operating system and you can enjoy a Linux virtual machine running on a Windows host.

Using the Quick Create option is useful for beginners or those who don’t want (or don’t have time) to dive into the process of creating a virtual machine. However, going through the entire virtual machine creation gives you more control over the created machine and its parameters.